• Blog
  • Say Hello
    • Bloglovin
    • Email
    • Facebook
    • Instagram
    • Pinterest

Back Porch Bliss

Living Our Good Old Days

  • ABOUT
  • HOME DECOR
  • DIY
  • GATHERING
  • RECIPES
  • NATURAL LIVING
  • INSPIRATION
  • SHOP
    • SHOP COZY FALL FAVORITES

in SAWDUST SATURDAY

Sawdust Saturday: Lemonade Stand

In my family, workshops are sacred spaces. My grandfather was a business owner, but also a creative spirit who made beautiful clocks and furniture on the side. I have fond memories of my dad in his workshop, which was also our garage. I remember having a small workbench where I would “use” my own tools alongside my dad, but I don’t remember ever really building anything. I think I may have hammered nails into leftover boards and painted them. Some of my favorite pieces were made by my grandfather and dad.

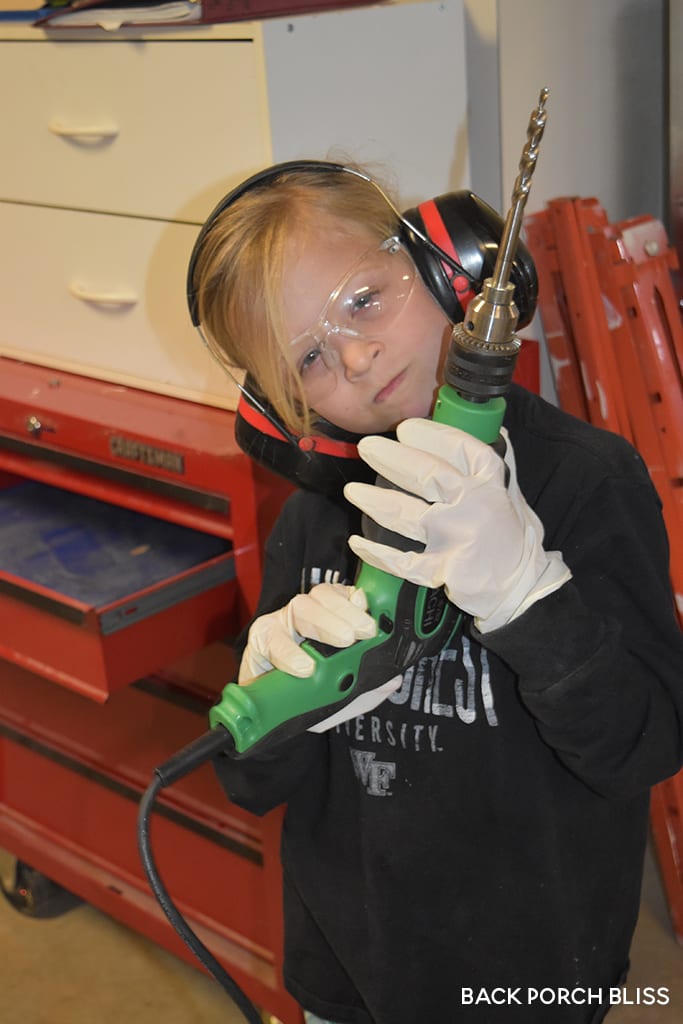
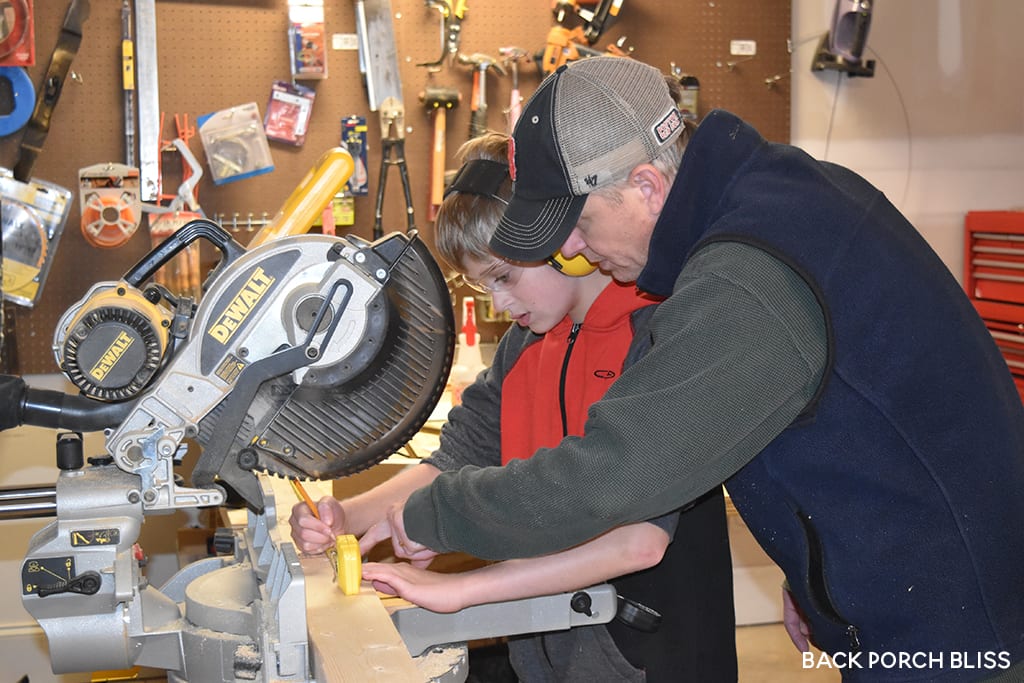
Jeff and I have a small workshop, also in our garage, where we like to do our DIY and build projects. We decided to make our Saturday projects a family affair, so the kids would know how to use tools and enjoy the time together. You know what they say, “the family that builds together…” Ok, I have no idea if anyone actually says that.

The Family That Builds Together

Cutting Boards

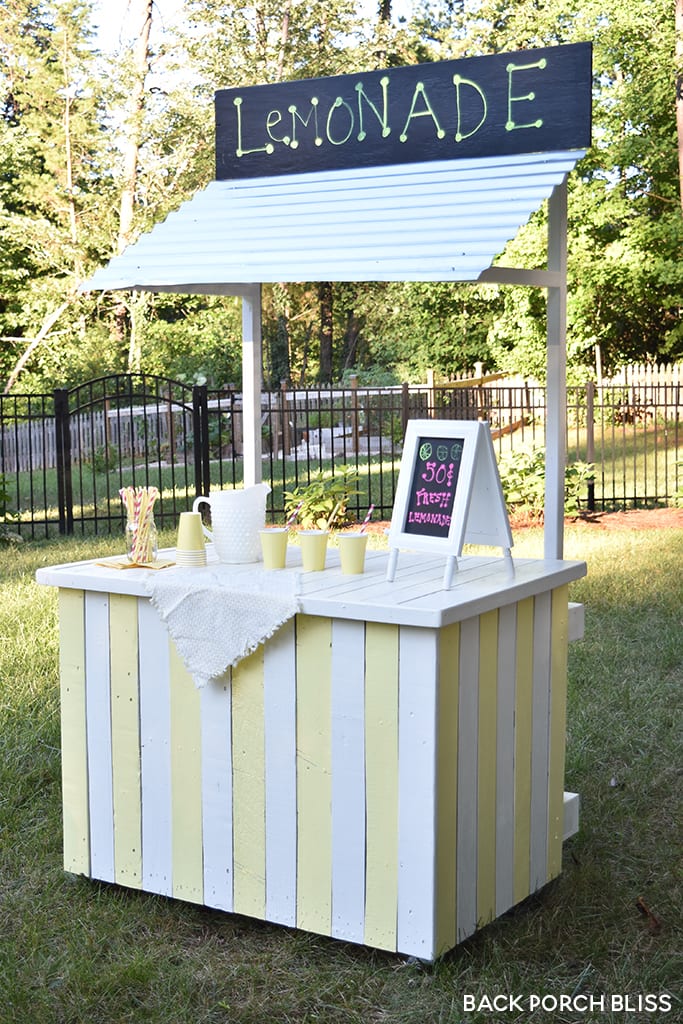
For the last couple years, my daughter has been putting together make-shift stands to sell random things, although I don’t think it’s ever been lemonade. We had a “Blue Wood For Sale” stand once, where she shouted at neighbors to buy her painted wood. When that didn’t work, she walked through the neighborhood with her mini wheelbarrow filled with blue wood, also shouting “Blue Wood for Sale!” Bless. We figured having an actual stand might help improve her sales. The lemonade stand project was our first official Sawdust Saturday!

Lemonade Stand

Here’s what you’ll need:

Tools

  • Miter Saw
  • Kreg Jig
  • Brad Nailer
  • Drill
  • Orbital Sander
  • Clamps
  • Square
  • Circular Saw w/diamond blade (For corrugated metal roof – optional)

Supplies

  • 2×4
  • 2×2
  • ½ x 4 boards from pallets or 3/8” plywood boards ripped down
  • 2 ½ Kreg Screws
  • 1 ¼  Brad Nails
  • 2 ¼  Brad Nails
  • Chalk Board Paint
  • Corrugated Roofing (optional)

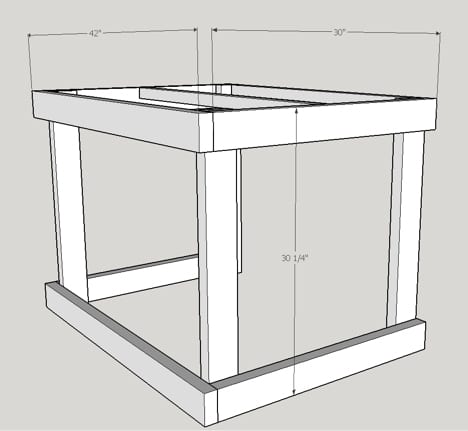
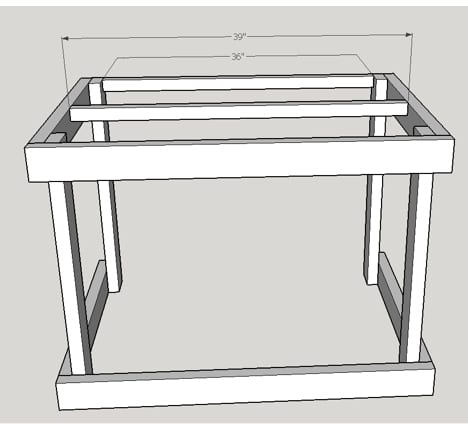
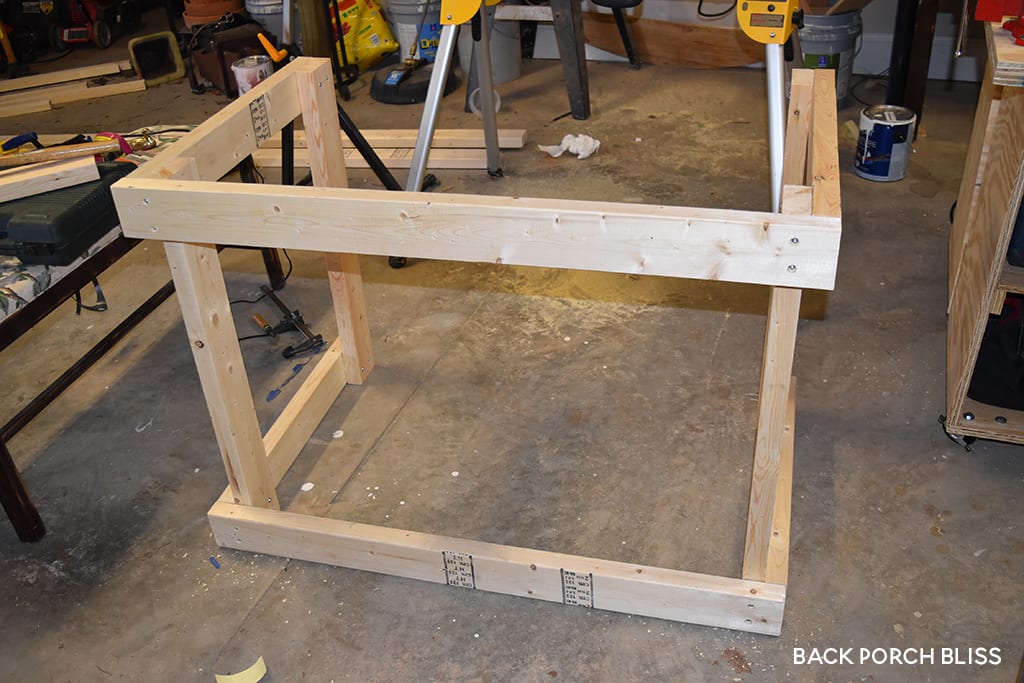
Step 1 – Creating the Base – Its all about that BASE. Sorry, I couldn’t help myself!

  • Using your miter saw, cut the 2x4s down to the measurements specified below. (The lemonade stand turned out to be a little larger than we expected.  We would have probably preferred for it to be smaller so make adjustments as you feel are needed.)
    • (2) Front horizontal 2x4s – 42 inches
    • (4) Side Horizontal 2x4s –  30 inches
    • (4) Inside Vertical 2x4s  –  30 ¼ inches
    • (1) Top Horizontal 2×2 –  39 inches
    • (1) Top Horizontal 2×2 – 36 inches
  • Using the Kreg Jig, drill pockets holes at one end of each of the (4) 30-inch horizontal 2x4s and then secure them to the (2) front horizontal pieces with 2 ½ inch pocket hole screws.
  • Secure the vertical 2x4s to the inside of the braces just created with 2 inch wood screws.
  • Secure the (2) 2×2 pieces to the top of the brace – 39 inch piece towards the middle and the 36 inch piece on the end.

Lemonade Stand Diagram 1

Lemonade Stand Diagram 2

Frame

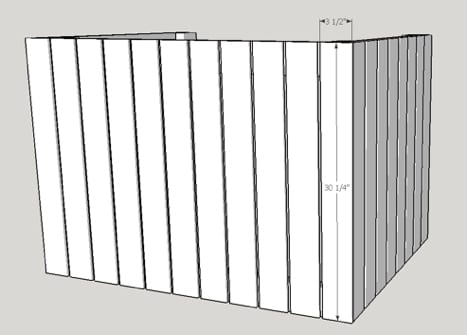
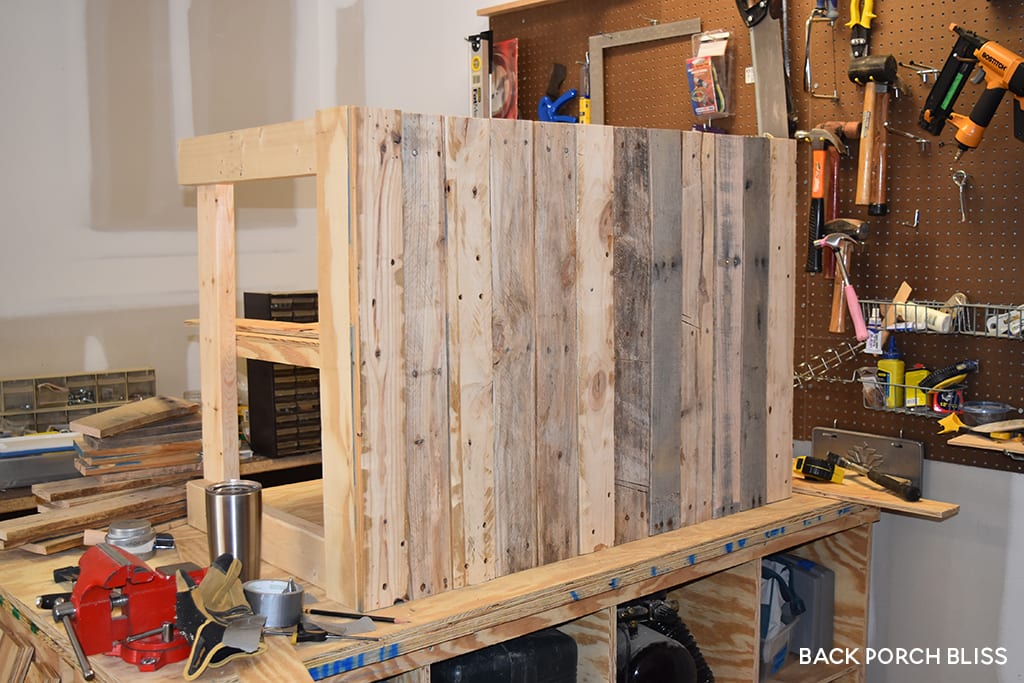
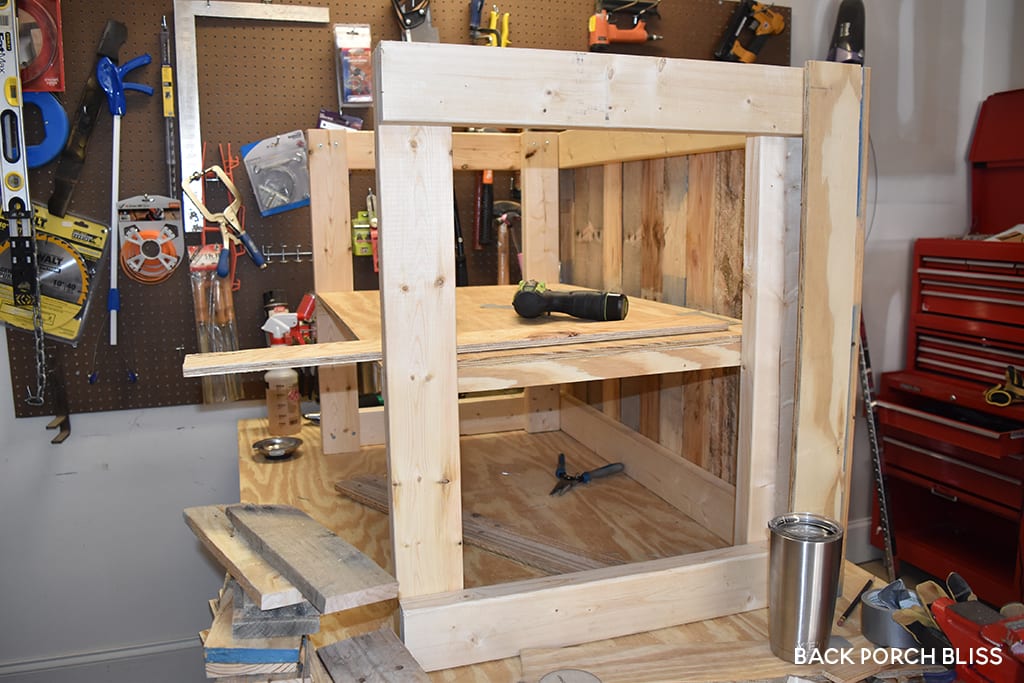
Step 2 – Building the Front/Side

  • We found old pallets to use for our walls and the width of the boards were about 3 ½ inches.  We liked the beat up/weathered look.  You could easily take a sheet of plywood and rip it down to the size you wanted.  In this plan, the boards were 3 ½ inches wide x 30 ¼ height.  We ended up needing 27 boards (11 for the front and 8 for each side).
  • Front – I overhung the two ends pieces 3/8 inch so that the side pieces would butt up against them nicely.  I did not measure the distance in between the planks but rather just eyed them up.  I used 1 ¼ brad nails and my nailer to secure them to the base.
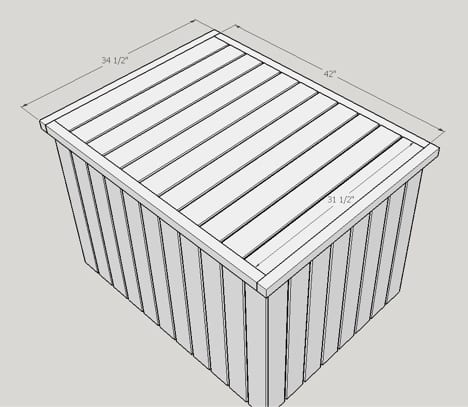
Lemonade Stand Diagram 3

Stand Base with Pallet Boards

Step 3 – Top

The top is constructed using 2x2s and pallet wood planks or plywood.  Cut the 2x2s down into (2) 42 inch pieces and (2) 34 ½ inch pieces.  Cut the planks into (11) 34 ½ inch x 3 ½ inch pieces.

  • Planks (11)
    • Distribute the 11 planks evenly across the top. Secure them to the top braces using 1 ¼ inch brad nails.
  • 42 inch 2×2 (2)
    • Align the pieces with the top of your planks and secure them to the front and back brace using 2 ¼ brad nails or 2 inch wood screws.
  • 34 ½ inch 2×2 (2)
    • Align the pieces with the top of your planks and secure them to sides using 2 ¼ brad nails or 2 inch wood screws.
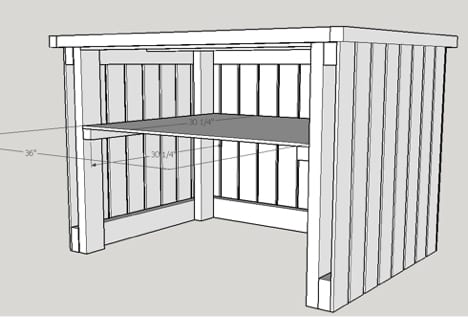
Lemonade Stand Diagram 4

Step 4 – Shelf

Shelf is constructed by using (2) 30 ¼ inch 2x2s and (1) 36 x 30 ¼ section of plywood or you could use more plywood/pallet wood planks.

  • Secure the (2) 30 ¼ inch 2x2s to the inside of the base with 2-inch wood screws.  How high you would like the shelf to be is up to you.
  • Secure the 36 x 30 ¼ inch section of plywood to the 2x2s with 1 ¼ brad nails.

Lemonade Stand Diagram 5

Lemonade Stand Shelf

Step 5 – Roof Line and Chalkboard Sign

  • Using extra pieces of 2x4s I built (4) boxes that I secured to the base that allow the sign poles to slide in and out of.
  • The sign poles were built out of 2x2s at 77 inches tall.
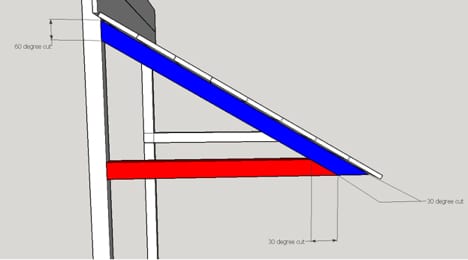
  • Support for the roof – built from 2x2s
    • Piece pictured in blue.  The top angle was cut at 60 degrees and is 26 inches in length on top.  The bottom angle of the blue piece was cut at 30 degrees.
    • The red piece is 19 inches wide on the bottom and is cut at an angle of 30 degrees.
    • The pieces are secured to the 2×2 posts by 1 ½ wood screws angled from the bottom.
  • The roof as show in this graphic was built from pallet wood planks or plywood.  You will need 10 planks measured at 46 x 3 ½ inches. They are fastened to the support with 1 ¼ brad nails
  • Optional Roof – I bought corrugated roof from Home Depot – 8 x 2 foot section for about $10.00.  I splurged and bought a diamond blade for my circular saw and cut the piece to the dimensions of 46×24 inches.  I drilled pilot holes through the metal and secured it to the roof support with wood screws.
  • Chalkboard sign was built using 1 plywood plank measuring 46 in. by 10 in. It was secured to the top with 1 ¼ inch brad nails.  Paint the plank with a couple coats of chalkboard paint.
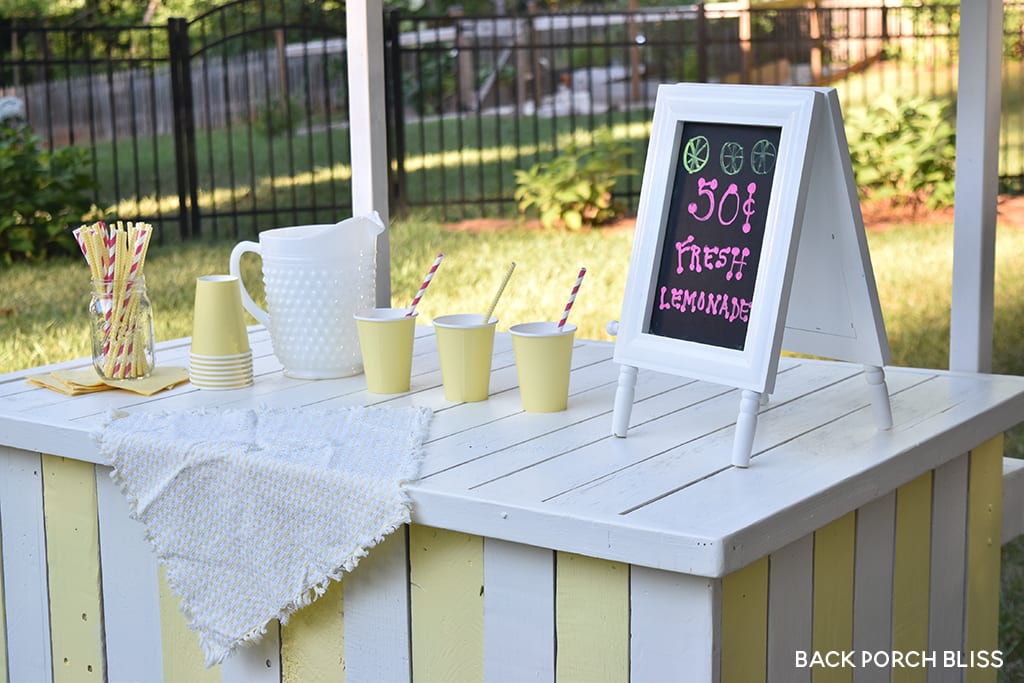
Lemonade Stand Diagram 6

Stand Close up

SaveSave

SaveSave

SaveSave

SaveSave

SaveSave

SaveSave

SaveSave

SaveSave

SaveSave

SaveSave

SaveSave

SaveSave

You Might Also Like:

Pallet SignSawdust Saturday: Easy Pallet Signs StarfishSawdust Saturday: Sea Tree Simple Advent TreeSawdust Saturday: Simple Advent Tree finished chairSawdust Saturday: Adirondack Chairs Farmhouse TrayFarmhouse Bed Tray

« Sawdust Saturday: Sea Tree
Easy Makeover: Office Hutch »

Comments

  1. Jonna Yarbrough says

    June 23, 2018 at 9:31 am

    It’s AMAZING!

    • Misty says

      June 23, 2018 at 8:13 pm

      Thank you, Jonna!

meet the blogger

I’m Misty, a writer, thinker, creative spirit, wisdom-seeker and memory-keeper. A wife & working mom, lover of all things family. My life is best summed up by lyrics of two favorites: “then sings my soul” and “ya’ll gonna make me lose my mind.” On a good day, you'll find me on the porch with a book and a cup of hot tea. All of it inspires me. Read More…

let’s be friends!

  • Email
  • Facebook
  • Instagram
  • Pinterest

Stay up to date

Categories

Join me on Instagram

backporchbliss

Go try Lot 63’s Spiced Latte! It’s delish and Go try Lot 63’s Spiced Latte! It’s delish and comes with a spiced ginger cookie on top. It smells and tastes like all the Moravian goodness.🌟 You know, like home.💛PS- they have other goodies + beer and pretzels.🥨
It was an honor to spend a little time tonight lis It was an honor to spend a little time tonight listening to the wisdom of @emilypfreeman and @thelazygenius at @bookmarksnc 💙📚 Cheers to discerning with patience and courage, following arrows and practicing holy indifference as we raise the next generation. 🥂
BOO!!! Up for a quick, spooky and inexpensive craf BOO!!! Up for a quick, spooky and inexpensive craft? All you need is a pack of cheesecloth, small foam balls, ribbon, sticky-back black felt, and string if you’re hanging your ghosts. Tip- once your ghosts are made, carefully separate sections of the cheesecloth to make it look like they’re floating! 👻
Maine Lobstah Shack with my 🦞 lobster!! If you’re in Surf City, NC, don’t miss this delicious taste of Maine right here in NC! ❤️ Tell Trevor we sent you. @mainelobstahshack
I don’t know about you, but I love a cozy night I don’t know about you, but I love a cozy night in. Add games (the non-video variety!), snacks, and good company and you’ve made my evening. We’ve had a lot of family game nights over the years, especially in the last couple of years. You can plan a game night any season, but there’s just something about cozying up for a fun evening when the weather is starting to get chilly. We're still hoping for chilly over here! 

Check out my top tips for planning a cozy game night, favorite games and snack ideas, on the blog today. What's your favorite board game?

#familygamenight #cozynightin #cozygamenight #hyggegames #gathering #familyfun #gamenightrecipes #gamedayrecipes #backporchbliss #simblissity
I’m not going to pretend to know all the rules o I’m not going to pretend to know all the rules of charcuterie, because I don’t know them. Ha! But I will share a few simple tips I used to make these adorable shortcut charcuterie MINI BOARDS, along with a quick and easy shopping list. Aren’t they the cutest? Link @backporchbliss 🍁🍇🥂🧀
I’m not going to pretend to know all the rules o I’m not going to pretend to know all the rules of charcuterie, because I don’t know them. Ha! But I will share a few simple tips I used to make these adorable shortcut charcuterie MINI BOARDS. Aren’t they the cutest? Jeff and I have been talking about making mini charcuterie boards, but when I walked into @fiddleandfigmarket and saw these, they were so affordable I just went ahead and purchased them. On the blog, I share charcuterie ideas and a quick @traderjoes list and must-haves to keep it simple. Link in bio @backporchbliss. 🍁🍇🥂🧀

#charcuterietips, #charcuterieboard #smallbites #food52 #easyrecipes #simplerecipes #easyappetizers #cocktailparty #shortrecipes #traderjoes #traderjoesfinds #fiddleandfigmarket #minicharcuterie #minicharcuterieboard #backporchbliss #simblissity
Fall decor doesn’t have to be fussy. Make these Fall decor doesn’t have to be fussy. Make these simple jack-o-lantern luminaries from recycled jars and bottles. Our cozy back porch is ready— bring on the cooler weather and colorful shades of autumn. 🍁🍂🎃👻🍁 Link in bio @backporchbliss.
Repeat after me: Fall decor doesn’t have to be f Repeat after me: Fall decor doesn’t have to be fussy. Or expensive.

These fresh-faced jack-o-lantern luminaries were made using recycled jars and wine bottles and a few supplies I had on hand. I added a few real pumpkins in different sizes from Trader Joe’s– I think these striped cuties were just over $1 each. Aren’t they pretty? My back porch is ready for fall. The tutorial for the luminaries is on the blog today-- post link in bio. 

Are you keeping your fall decor unfussy, or are you going all out?
Load More... Follow on Instagram

About Back Porch Bliss

Back Porch Bliss is about the everyday simple— yet blissful— moments. In our home, we call it simblissity. It’s living our good old days and I’m finding there’s no better way of life. Pull up a chair!

let’s be friends!

  • Email
  • Facebook
  • Instagram
  • Pinterest

Looking for something?

join me on instagram

backporchbliss

Go try Lot 63’s Spiced Latte! It’s delish and Go try Lot 63’s Spiced Latte! It’s delish and comes with a spiced ginger cookie on top. It smells and tastes like all the Moravian goodness.🌟 You know, like home.💛PS- they have other goodies + beer and pretzels.🥨
It was an honor to spend a little time tonight lis It was an honor to spend a little time tonight listening to the wisdom of @emilypfreeman and @thelazygenius at @bookmarksnc 💙📚 Cheers to discerning with patience and courage, following arrows and practicing holy indifference as we raise the next generation. 🥂
BOO!!! Up for a quick, spooky and inexpensive craf BOO!!! Up for a quick, spooky and inexpensive craft? All you need is a pack of cheesecloth, small foam balls, ribbon, sticky-back black felt, and string if you’re hanging your ghosts. Tip- once your ghosts are made, carefully separate sections of the cheesecloth to make it look like they’re floating! 👻
Maine Lobstah Shack with my 🦞 lobster!! If you’re in Surf City, NC, don’t miss this delicious taste of Maine right here in NC! ❤️ Tell Trevor we sent you. @mainelobstahshack
I don’t know about you, but I love a cozy night I don’t know about you, but I love a cozy night in. Add games (the non-video variety!), snacks, and good company and you’ve made my evening. We’ve had a lot of family game nights over the years, especially in the last couple of years. You can plan a game night any season, but there’s just something about cozying up for a fun evening when the weather is starting to get chilly. We're still hoping for chilly over here! 

Check out my top tips for planning a cozy game night, favorite games and snack ideas, on the blog today. What's your favorite board game?

#familygamenight #cozynightin #cozygamenight #hyggegames #gathering #familyfun #gamenightrecipes #gamedayrecipes #backporchbliss #simblissity
I’m not going to pretend to know all the rules o I’m not going to pretend to know all the rules of charcuterie, because I don’t know them. Ha! But I will share a few simple tips I used to make these adorable shortcut charcuterie MINI BOARDS, along with a quick and easy shopping list. Aren’t they the cutest? Link @backporchbliss 🍁🍇🥂🧀
I’m not going to pretend to know all the rules o I’m not going to pretend to know all the rules of charcuterie, because I don’t know them. Ha! But I will share a few simple tips I used to make these adorable shortcut charcuterie MINI BOARDS. Aren’t they the cutest? Jeff and I have been talking about making mini charcuterie boards, but when I walked into @fiddleandfigmarket and saw these, they were so affordable I just went ahead and purchased them. On the blog, I share charcuterie ideas and a quick @traderjoes list and must-haves to keep it simple. Link in bio @backporchbliss. 🍁🍇🥂🧀

#charcuterietips, #charcuterieboard #smallbites #food52 #easyrecipes #simplerecipes #easyappetizers #cocktailparty #shortrecipes #traderjoes #traderjoesfinds #fiddleandfigmarket #minicharcuterie #minicharcuterieboard #backporchbliss #simblissity
Fall decor doesn’t have to be fussy. Make these Fall decor doesn’t have to be fussy. Make these simple jack-o-lantern luminaries from recycled jars and bottles. Our cozy back porch is ready— bring on the cooler weather and colorful shades of autumn. 🍁🍂🎃👻🍁 Link in bio @backporchbliss.
Repeat after me: Fall decor doesn’t have to be f Repeat after me: Fall decor doesn’t have to be fussy. Or expensive.

These fresh-faced jack-o-lantern luminaries were made using recycled jars and wine bottles and a few supplies I had on hand. I added a few real pumpkins in different sizes from Trader Joe’s– I think these striped cuties were just over $1 each. Aren’t they pretty? My back porch is ready for fall. The tutorial for the luminaries is on the blog today-- post link in bio. 

Are you keeping your fall decor unfussy, or are you going all out?
These two @hadleypottery canisters will forever be These two @hadleypottery canisters will forever be on my countertop-- I'm a third-generation lover of Hadley Pottery. Fun fact: I keep coffee pods in the cookie canister and teabags in the coffee canister. 

I loved pairing my handmade drop cloth pumpkins for this sweet fall kitchen vignette. Learn how to make these drop cloth pumpkins and a sweet ticking wreath on the blog. Just add a piece of a stick for the stem and some decorative Spanish moss on top. Also cute placed in a dough bowl or on your mantel. Easy, peasy, pumpkin squeezy! 

#hadleypottery #pumpkindecor #dropclothcrafts #dropcloth #fallcrafts #falldecor #fallyall #falldiy
Load More...
Copyright © 2025 Back Porch Bliss, All Rights Reserved

Privacy Policy, Disclosures & Copyright