• Blog
  • Say Hello
    • Bloglovin
    • Email
    • Facebook
    • Instagram
    • Pinterest

Back Porch Bliss

Living Our Good Old Days

  • ABOUT
  • HOME DECOR
  • DIY
  • GATHERING
  • RECIPES
  • NATURAL LIVING
  • INSPIRATION
  • SHOP
    • SHOP COZY FALL FAVORITES

in Pizza· RECIPES

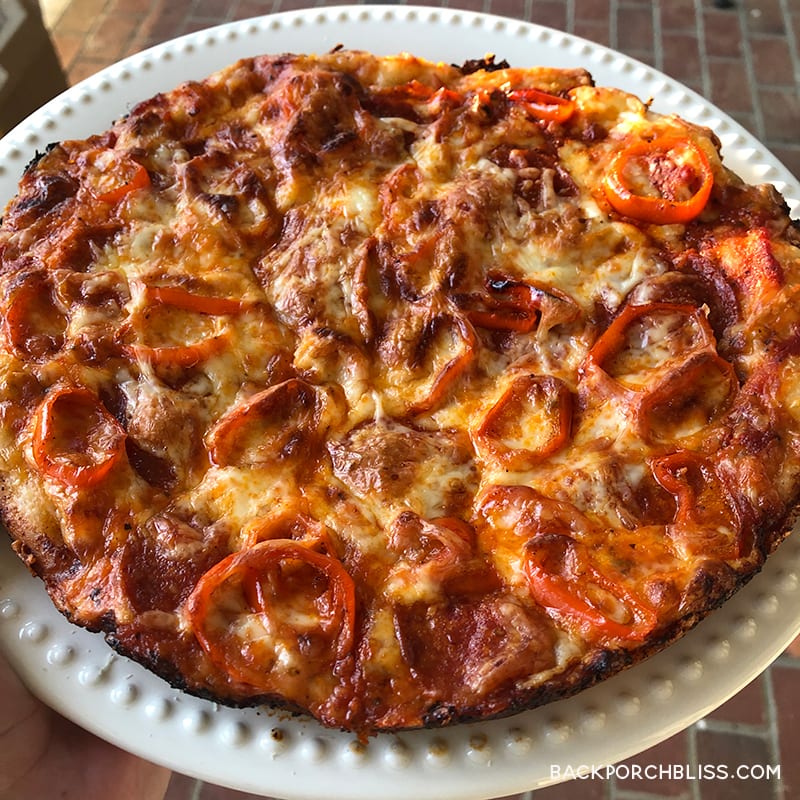
Best Crispy Pan Pizza

Since we’ve been in “stay-at home” status, we’ve made this pizza now four times, and I don’t know if we’ll ever order takeout pizza again.
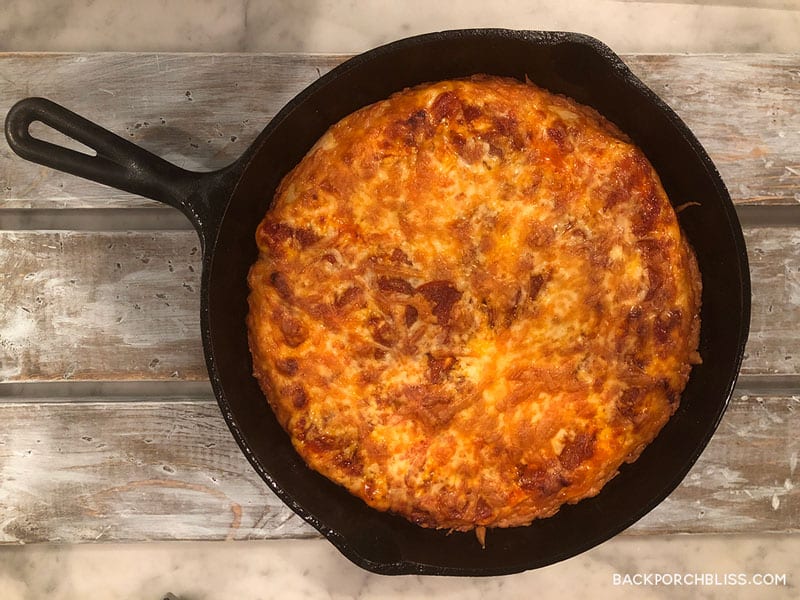
Crispy Pan Pizza

Before the first time we made it, I pictured us all in the kitchen wearing flour-covered aprons discussing how yeast rises and spinning crusts into the air. So to the kid’s daily to do lists, I asked them to do a little research on yeast, teach me three things, and then we’d make the pizza dough. Fun, right?

The first thing I heard was, “Stop trying to make everything school, Mom.” Well, I never.

At this point there are no daily lists, we’re doing the best we can with school and sometimes chocolate chips is a side dish.

Back to the pizza.

I discovered this recipe on King Arthur Flour’s page and read it was chosen as their 2020 Recipe of the Year. So, we gave it a try. Making the crust is a little time consuming with all the steps and wait times, but trust me when I say it’s well worth it. And it’s super simple.

We begin this process the day before pizza night:

Mix the flour, salt yeast, water and 1 tablespoon of olive oil in the bowl of a stand mixer. Stir together to make a shaggy, sticky mass of dough with no patches of flour. This takes about 45 seconds using the beater paddle. Scrape the sides of the bowl and gather the dough into a rough ball and cover the bowl for 5 minutes.
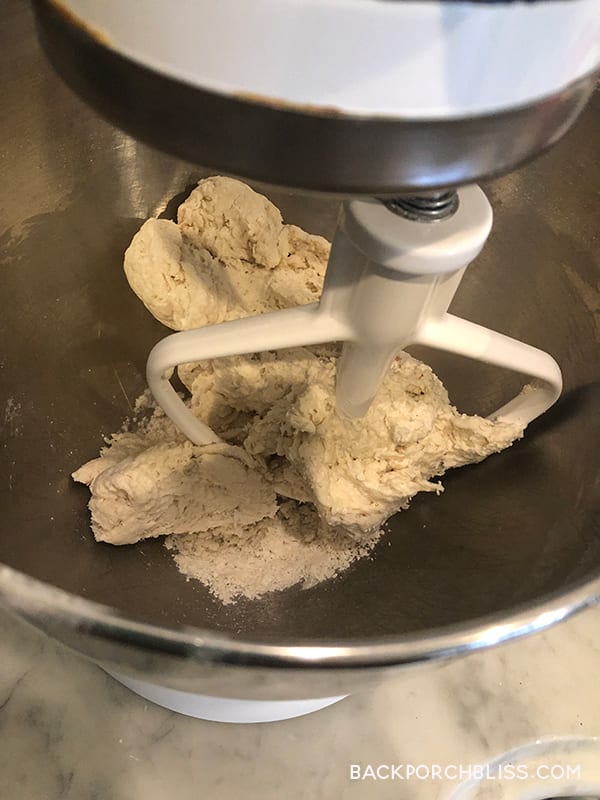
Crispy Pan Pizza Dough

Uncover the bowl and use your wet hand to go between the side of the bowl and the dough, as though you were going to lift the dough out and stretch the bottom of the dough up and over its top. Repeat three more times, turning the bowl 90° each time. This process of four stretches, which takes the place of kneading, is called a fold. Recover the bowl.

After 5 minutes do another fold. Wait 5 minutes and repeat; then another 5 minutes, and do a fourth and final fold. Cover the bowl and let the dough rest, undisturbed, for 40 minutes. Then refrigerate it for a minimum of 12 hours, or up to 72 hours. We typically do overnight. It’ll rise slowly as it chills, developing flavor.
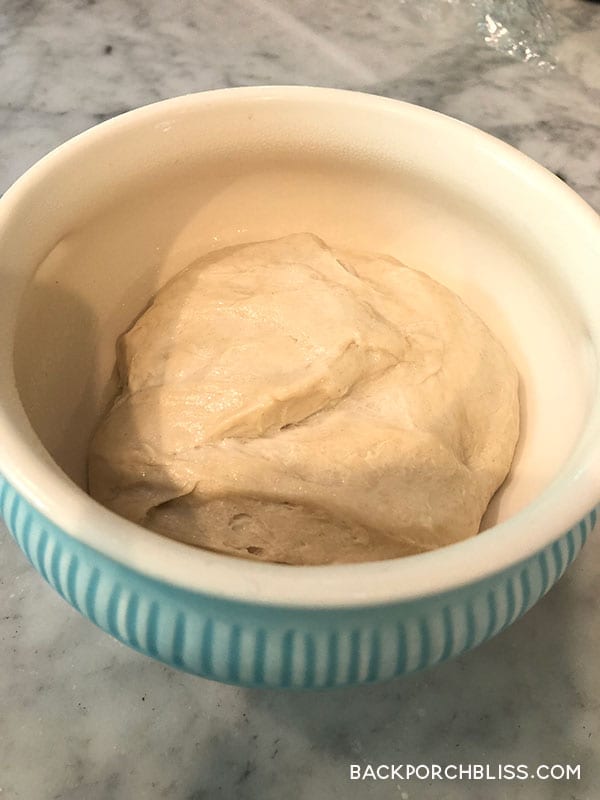
Crispy Pan Pizza Dough

About 3 hours before you want to serve your pizza, prepare your pan. Pour 1 1/2 tablespoons olive oil into a well-seasoned cast iron skillet. Heavy, dark cast iron will give you a superb crust; but if you don’t have it, use another oven-safe heavy-bottomed skillet of similar size, or a 10” round cake pan or 9” square pan. Tilt the pan to spread the oil across the bottom and edges.  

Move the dough to the pan and turn it once to coat both sides with the oil. After coating the dough in oil, press the dough to the edges of the pan, dimpling it using the tips of your fingers in the process. The dough may start to resist and shrink back; that’s OK, just cover it and let it rest for about 15 minutes, then repeat the dimpling/pressing. At this point the dough should reach the edges of the pan. 

Crispy Pan Pizza Crust

Cover the crust and let it rise for 2 hours at room temperature. The fully risen dough will look soft and pillowy and will jiggle when you gently shake the pan.

About 30 minutes before baking, place one rack at the bottom of the oven and one toward the top (about 4″ to 5″ from the top heating element). Preheat the oven to 450°F.

Crispy Pan Pizza

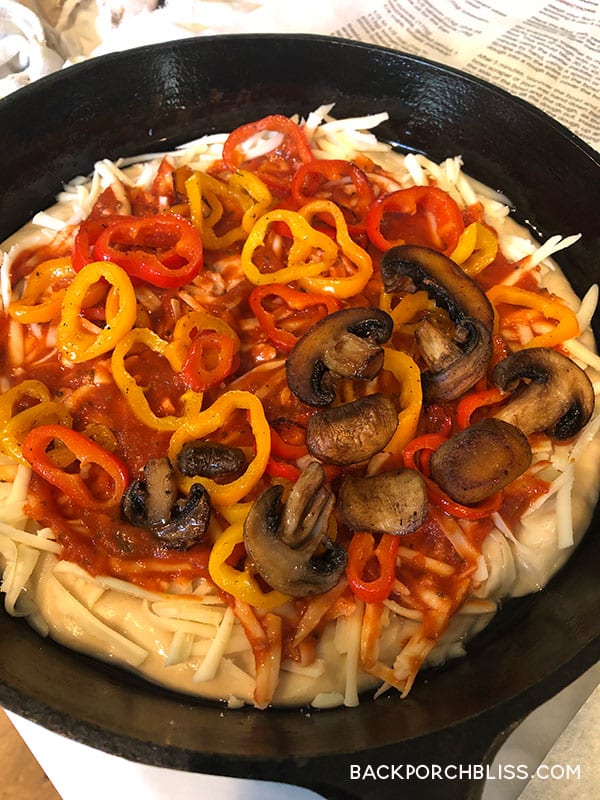
When you’re ready to bake the pizza, sprinkle about three-quarters of the mozzarella (about 1 cup) evenly over the crust. Cover the entire crust, no bare dough showing; this will yield caramelized edges. Dollop small spoonfuls of the sauce over the cheese; laying the cheese down first like this will prevent the sauce from seeping into the crust and making it soggy.

Crispy Pan Pizza

Sprinkle on the remaining mozzarella and any extra toppings. We like to add pepperoni, mushrooms and sautéed colorful peppers. Finally, we add a thin later of freshly-grated parmesan cheese.

Crispy Pan Pizza

Bake the pizza on the bottom rack of the oven for 18 to 20 minutes, until the cheese is bubbling and the bottom and edges of the crust are a rich golden brown (use a spatula to check the bottom). If the bottom is brown but the top still seems pale, transfer the pizza to the top rack and bake for 2 to 4 minutes longer. On the other hand, if the top seems fine but the bottom’s not browned to your liking, leave the pizza on the bottom rack for another 2 to 4 minutes.

Remove the pizza from the oven and place the pan on a heatproof surface. Carefully run a table knife or spatula between the edge of the pizza and side of the pan to prevent the cheese from sticking as it cools. Let the pizza cool very briefly; as soon as you feel comfortable doing so, carefully transfer it from the pan to a cooling rack or cutting surface. This will prevent the crust from becoming soggy.

Cut into eight wedges and serve.

More tips and details from King Arthur Flour can be found here.

Crispy Pan Pizza
Print
clock clock iconcutlery cutlery iconflag flag iconfolder folder iconinstagram instagram iconpinterest pinterest iconfacebook facebook iconprint print iconsquares squares iconheart heart iconheart solid heart solid icon
Best Crispy Pan Pizza

Best Crispy Pan Pizza


No reviews

  • Total Time: 0 hours
Pin Recipe
Print Recipe

Ingredients

Scale
  • Crust
  • 2 cups King Arthur Unbleached All-Purpose Flour
  • 3/4 teaspoon salt
  • 1/2 teaspoon instant yeast or active dry yeast
  • 3/4 cup lukewarm water
  • 1 tablespoon olive oil + 1 1/2 tablespoons olive oil for the pan
  • Topping
  • 6 ounces mozzarella, grated (about 1 1/4 cups, loosely packed)*
  • 1/3 to 1/2 cup tomato sauce or pizza sauce, homemade or store-bought
  • freshly grated hard cheese and fresh herbs for sprinkling on top after baking, optional*
  • Toppings of your choice: pepperoni, black olives, peppers, fresh herbs, fresh parmesan

Instructions

  1. Mix the flour, salt yeast, water and 1 tablespoon of olive oil in the bowl of a stand mixer. Stir together to make a shaggy, sticky mass of dough with no patches of flour. This takes about 45 seconds using the beater paddle. Scrape the sides of the bowl and gather the dough into a rough ball and cover the bowl for 5 minutes.
  2. Uncover the bowl and use your wet hand to go between the side of the bowl and the dough, as though you were going to lift the dough out and stretch the bottom of the dough up and over its top. Repeat three more times, turning the bowl 90° each time. This process of four stretches, which takes the place of kneading, is called a fold. Recover the bowl.
  3. After 5 minutes do another fold. Wait 5 minutes and repeat; then another 5 minutes, and do a fourth and final fold. Cover the bowl and let the dough rest, undisturbed, for 40 minutes. Then refrigerate it for a minimum of 12 hours, or up to 72 hours. We typically do overnight. It’ll rise slowly as it chills, developing flavor.
  4. About 3 hours before you want to serve your pizza, prepare your pan. Pour 1 1/2 tablespoons olive oil into a well-seasoned cast iron skillet. Heavy, dark cast iron will give you a superb crust; but if you don’t have it, use another oven-safe heavy-bottomed skillet of similar size, or a 10” round cake pan or 9” square pan. Tilt the pan to spread the oil across the bottom and edges.
  5. Move the dough to the pan and turn it once to coat both sides with the oil. After coating the dough in oil, press the dough to the edges of the pan, dimpling it using the tips of your fingers in the process. The dough may start to resist and shrink back; that’s OK, just cover it and let it rest for about 15 minutes, then repeat the dimpling/pressing. At this point the dough should reach the edges of the pan.
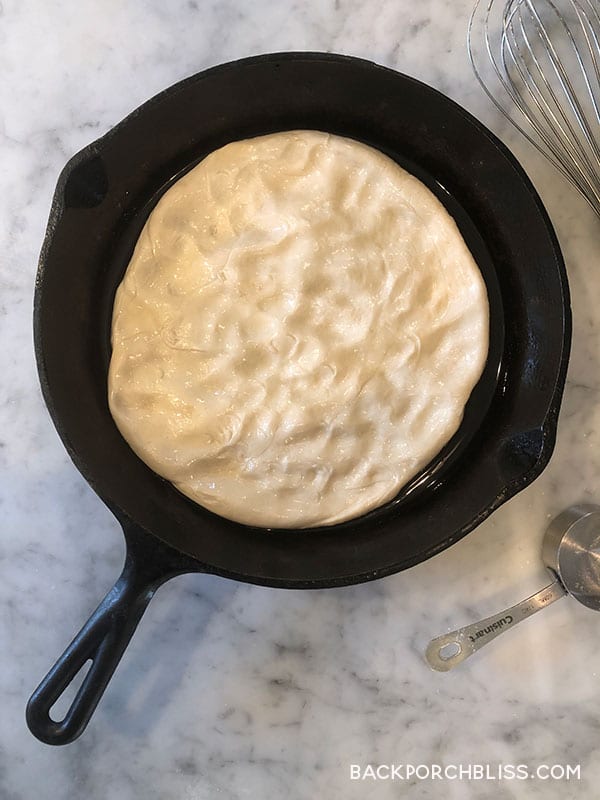
  6. Cover the crust and let it rise for 2 hours at room temperature. The fully risen dough will look soft and pillowy and will jiggle when you gently shake the pan.
  7. About 30 minutes before baking, place one rack at the bottom of the oven and one toward the top (about 4″ to 5″ from the top heating element). Preheat the oven to 450°F.
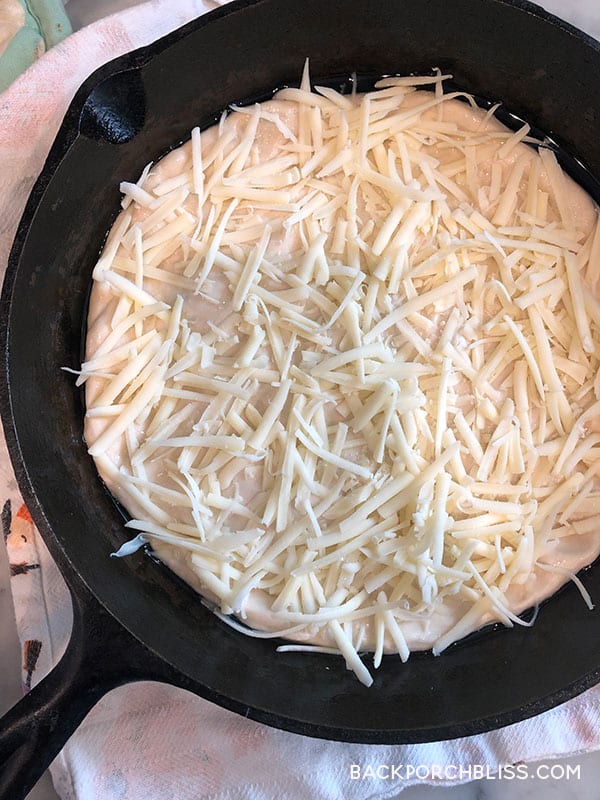
  8. When you’re ready to bake the pizza, sprinkle about three-quarters of the mozzarella (about 1 cup) evenly over the crust. Cover the entire crust, no bare dough showing; this will yield caramelized edges. Dollop small spoonfuls of the sauce over the cheese; laying the cheese down first like this will prevent the sauce from seeping into the crust and making it soggy.
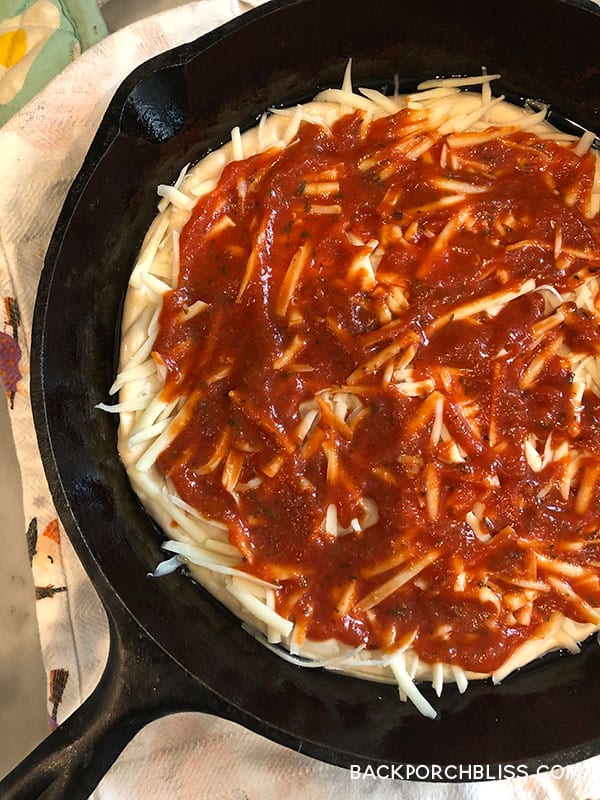
  9. Sprinkle on the remaining mozzarella and any extra toppings. We like to add pepperoni, mushrooms and sautéed colorful peppers. Finally, we add a thin later of freshly-grated parmesan cheese.
  10. Bake the pizza on the bottom rack of the oven for 18 to 20 minutes, until the cheese is bubbling and the bottom and edges of the crust are a rich golden brown (use a spatula to check the bottom). If the bottom is brown but the top still seems pale, transfer the pizza to the top rack and bake for 2 to 4 minutes longer. On the other hand, if the top seems fine but the bottom’s not browned to your liking, leave the pizza on the bottom rack for another 2 to 4 minutes.
  11. Remove the pizza from the oven and place the pan on a heatproof surface. Carefully run a table knife or spatula between the edge of the pizza and side of the pan to prevent the cheese from sticking as it cools. Let the pizza cool very briefly; as soon as you feel comfortable doing so, carefully transfer it from the pan to a cooling rack or cutting surface. This will prevent the crust from becoming soggy.
  12. Cut into eight wedges and serve.
  • Prep Time: 0 hours
  • Cook Time: 0 hours

Did you make this recipe?

Share a photo and tag @backporchbliss — I can’t wait to see what you’ve made!

You Might Also Like:

Champagne Cukes & Onions Pimiento CheeseSouthern Pimiento Cheese with Olives Easy Homemade Mac & Cheese Chicken, Avocado & Tortellini SaladChicken, Avocado and Tortellini Salad Fried Green TomatoesFried Green Tomatoes with Goat Cheese & Herbs

« Approach the New Year with a Vision Board
April’s Guacamole »

meet the blogger

I’m Misty, a writer, thinker, creative spirit, wisdom-seeker and memory-keeper. A wife & working mom, lover of all things family. My life is best summed up by lyrics of two favorites: “then sings my soul” and “ya’ll gonna make me lose my mind.” On a good day, you'll find me on the porch with a book and a cup of hot tea. All of it inspires me. Read More…

let’s be friends!

  • Email
  • Facebook
  • Instagram
  • Pinterest

Stay up to date

Categories

Join me on Instagram

backporchbliss

Go try Lot 63’s Spiced Latte! It’s delish and Go try Lot 63’s Spiced Latte! It’s delish and comes with a spiced ginger cookie on top. It smells and tastes like all the Moravian goodness.🌟 You know, like home.💛PS- they have other goodies + beer and pretzels.🥨
It was an honor to spend a little time tonight lis It was an honor to spend a little time tonight listening to the wisdom of @emilypfreeman and @thelazygenius at @bookmarksnc 💙📚 Cheers to discerning with patience and courage, following arrows and practicing holy indifference as we raise the next generation. 🥂
BOO!!! Up for a quick, spooky and inexpensive craf BOO!!! Up for a quick, spooky and inexpensive craft? All you need is a pack of cheesecloth, small foam balls, ribbon, sticky-back black felt, and string if you’re hanging your ghosts. Tip- once your ghosts are made, carefully separate sections of the cheesecloth to make it look like they’re floating! 👻
Maine Lobstah Shack with my 🦞 lobster!! If you’re in Surf City, NC, don’t miss this delicious taste of Maine right here in NC! ❤️ Tell Trevor we sent you. @mainelobstahshack
I don’t know about you, but I love a cozy night I don’t know about you, but I love a cozy night in. Add games (the non-video variety!), snacks, and good company and you’ve made my evening. We’ve had a lot of family game nights over the years, especially in the last couple of years. You can plan a game night any season, but there’s just something about cozying up for a fun evening when the weather is starting to get chilly. We're still hoping for chilly over here! 

Check out my top tips for planning a cozy game night, favorite games and snack ideas, on the blog today. What's your favorite board game?

#familygamenight #cozynightin #cozygamenight #hyggegames #gathering #familyfun #gamenightrecipes #gamedayrecipes #backporchbliss #simblissity
I’m not going to pretend to know all the rules o I’m not going to pretend to know all the rules of charcuterie, because I don’t know them. Ha! But I will share a few simple tips I used to make these adorable shortcut charcuterie MINI BOARDS, along with a quick and easy shopping list. Aren’t they the cutest? Link @backporchbliss 🍁🍇🥂🧀
I’m not going to pretend to know all the rules o I’m not going to pretend to know all the rules of charcuterie, because I don’t know them. Ha! But I will share a few simple tips I used to make these adorable shortcut charcuterie MINI BOARDS. Aren’t they the cutest? Jeff and I have been talking about making mini charcuterie boards, but when I walked into @fiddleandfigmarket and saw these, they were so affordable I just went ahead and purchased them. On the blog, I share charcuterie ideas and a quick @traderjoes list and must-haves to keep it simple. Link in bio @backporchbliss. 🍁🍇🥂🧀

#charcuterietips, #charcuterieboard #smallbites #food52 #easyrecipes #simplerecipes #easyappetizers #cocktailparty #shortrecipes #traderjoes #traderjoesfinds #fiddleandfigmarket #minicharcuterie #minicharcuterieboard #backporchbliss #simblissity
Fall decor doesn’t have to be fussy. Make these Fall decor doesn’t have to be fussy. Make these simple jack-o-lantern luminaries from recycled jars and bottles. Our cozy back porch is ready— bring on the cooler weather and colorful shades of autumn. 🍁🍂🎃👻🍁 Link in bio @backporchbliss.
Repeat after me: Fall decor doesn’t have to be f Repeat after me: Fall decor doesn’t have to be fussy. Or expensive.

These fresh-faced jack-o-lantern luminaries were made using recycled jars and wine bottles and a few supplies I had on hand. I added a few real pumpkins in different sizes from Trader Joe’s– I think these striped cuties were just over $1 each. Aren’t they pretty? My back porch is ready for fall. The tutorial for the luminaries is on the blog today-- post link in bio. 

Are you keeping your fall decor unfussy, or are you going all out?
Load More... Follow on Instagram

About Back Porch Bliss

Back Porch Bliss is about the everyday simple— yet blissful— moments. In our home, we call it simblissity. It’s living our good old days and I’m finding there’s no better way of life. Pull up a chair!

let’s be friends!

  • Email
  • Facebook
  • Instagram
  • Pinterest

Looking for something?

join me on instagram

backporchbliss

Go try Lot 63’s Spiced Latte! It’s delish and Go try Lot 63’s Spiced Latte! It’s delish and comes with a spiced ginger cookie on top. It smells and tastes like all the Moravian goodness.🌟 You know, like home.💛PS- they have other goodies + beer and pretzels.🥨
It was an honor to spend a little time tonight lis It was an honor to spend a little time tonight listening to the wisdom of @emilypfreeman and @thelazygenius at @bookmarksnc 💙📚 Cheers to discerning with patience and courage, following arrows and practicing holy indifference as we raise the next generation. 🥂
BOO!!! Up for a quick, spooky and inexpensive craf BOO!!! Up for a quick, spooky and inexpensive craft? All you need is a pack of cheesecloth, small foam balls, ribbon, sticky-back black felt, and string if you’re hanging your ghosts. Tip- once your ghosts are made, carefully separate sections of the cheesecloth to make it look like they’re floating! 👻
Maine Lobstah Shack with my 🦞 lobster!! If you’re in Surf City, NC, don’t miss this delicious taste of Maine right here in NC! ❤️ Tell Trevor we sent you. @mainelobstahshack
I don’t know about you, but I love a cozy night I don’t know about you, but I love a cozy night in. Add games (the non-video variety!), snacks, and good company and you’ve made my evening. We’ve had a lot of family game nights over the years, especially in the last couple of years. You can plan a game night any season, but there’s just something about cozying up for a fun evening when the weather is starting to get chilly. We're still hoping for chilly over here! 

Check out my top tips for planning a cozy game night, favorite games and snack ideas, on the blog today. What's your favorite board game?

#familygamenight #cozynightin #cozygamenight #hyggegames #gathering #familyfun #gamenightrecipes #gamedayrecipes #backporchbliss #simblissity
I’m not going to pretend to know all the rules o I’m not going to pretend to know all the rules of charcuterie, because I don’t know them. Ha! But I will share a few simple tips I used to make these adorable shortcut charcuterie MINI BOARDS, along with a quick and easy shopping list. Aren’t they the cutest? Link @backporchbliss 🍁🍇🥂🧀
I’m not going to pretend to know all the rules o I’m not going to pretend to know all the rules of charcuterie, because I don’t know them. Ha! But I will share a few simple tips I used to make these adorable shortcut charcuterie MINI BOARDS. Aren’t they the cutest? Jeff and I have been talking about making mini charcuterie boards, but when I walked into @fiddleandfigmarket and saw these, they were so affordable I just went ahead and purchased them. On the blog, I share charcuterie ideas and a quick @traderjoes list and must-haves to keep it simple. Link in bio @backporchbliss. 🍁🍇🥂🧀

#charcuterietips, #charcuterieboard #smallbites #food52 #easyrecipes #simplerecipes #easyappetizers #cocktailparty #shortrecipes #traderjoes #traderjoesfinds #fiddleandfigmarket #minicharcuterie #minicharcuterieboard #backporchbliss #simblissity
Fall decor doesn’t have to be fussy. Make these Fall decor doesn’t have to be fussy. Make these simple jack-o-lantern luminaries from recycled jars and bottles. Our cozy back porch is ready— bring on the cooler weather and colorful shades of autumn. 🍁🍂🎃👻🍁 Link in bio @backporchbliss.
Repeat after me: Fall decor doesn’t have to be f Repeat after me: Fall decor doesn’t have to be fussy. Or expensive.

These fresh-faced jack-o-lantern luminaries were made using recycled jars and wine bottles and a few supplies I had on hand. I added a few real pumpkins in different sizes from Trader Joe’s– I think these striped cuties were just over $1 each. Aren’t they pretty? My back porch is ready for fall. The tutorial for the luminaries is on the blog today-- post link in bio. 

Are you keeping your fall decor unfussy, or are you going all out?
These two @hadleypottery canisters will forever be These two @hadleypottery canisters will forever be on my countertop-- I'm a third-generation lover of Hadley Pottery. Fun fact: I keep coffee pods in the cookie canister and teabags in the coffee canister. 

I loved pairing my handmade drop cloth pumpkins for this sweet fall kitchen vignette. Learn how to make these drop cloth pumpkins and a sweet ticking wreath on the blog. Just add a piece of a stick for the stem and some decorative Spanish moss on top. Also cute placed in a dough bowl or on your mantel. Easy, peasy, pumpkin squeezy! 

#hadleypottery #pumpkindecor #dropclothcrafts #dropcloth #fallcrafts #falldecor #fallyall #falldiy
Load More...
Copyright © 2025 Back Porch Bliss, All Rights Reserved

Privacy Policy, Disclosures & Copyright